Application Initialization
This guide walks through the complete initial setup of a freshly installed IDIAL-APP — from first launch to a fully operational application. Follow the steps in order. Everything described here only needs to be done once.
What you will need for setup:
- A secure way to generate and store the
recovery-adminpassword - A valid IDIAL-APP license file (
.lic) - A TLS server certificate for IDIAL-APP as a PKCS12 file (
.p12/.pfx) along with its password - The Root CA certificate and any Intermediate CA certificates from your internal PKI, needed to load and successfully validate the IDIAL-APP TLS certificate
- The public DNS name under which IDIAL-APP will be accessible
Step 1 — Set the Recovery Admin Password
When you open the IDIAL-APP URL in a browser for the first time, you are automatically redirected to the setup screen. The application enforces this step — normal operation is not possible before it is completed.
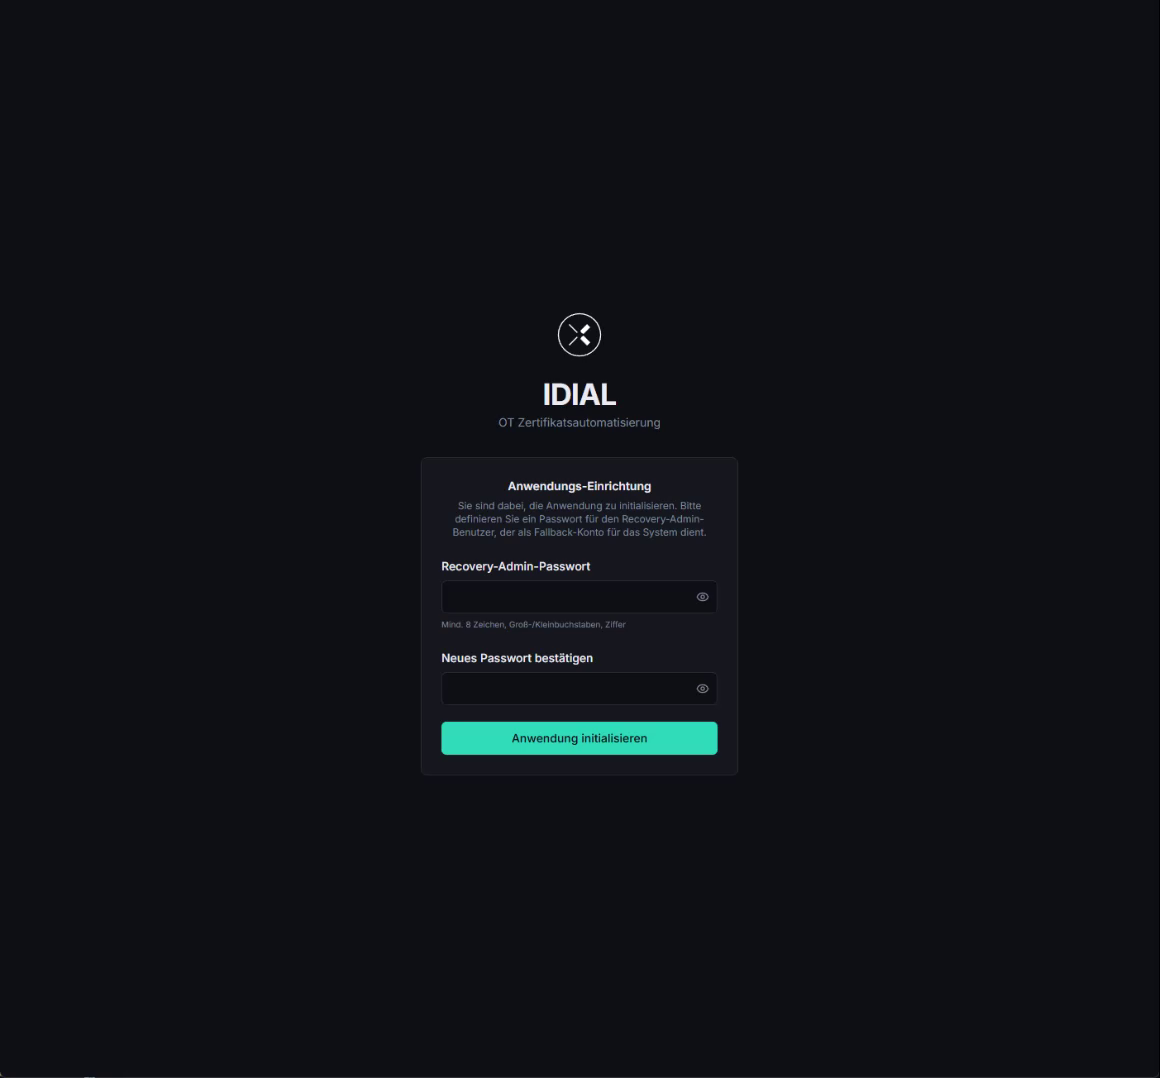
On the Application Setup screen, you must set a password for the recovery-admin user. Enter the desired password in the Recovery Admin Password field and repeat it in the Confirm New Password field.
The password must meet the following requirements (shown below the field):
- At least 8 characters, maximum 128 characters
- At least one uppercase and one lowercase letter
- At least one digit
Click Initialize Application. The application sets itself up and automatically redirects you to the login screen.
What is the Recovery Admin?
The recovery-admin is a built-in system user with full rights over the entire application. Its permissions cannot be restricted and the user cannot be deleted. It serves as an emergency fallback for the following situations:
- All other administrators were accidentally deleted or locked out
- Emergency access in case of configuration issues or unavailability of other authentication services
- Initial administration directly after installation
The Recovery Admin password must be chosen to be complex and stored securely — for example in a password manager or a physically secured vault. Anyone who knows this password has unrestricted access to the entire application. For day-to-day operations, you should not use the Recovery Admin — instead, create a dedicated administrator user (see Step 4).
Step 2 — First Login
After initialization, the regular login screen appears.
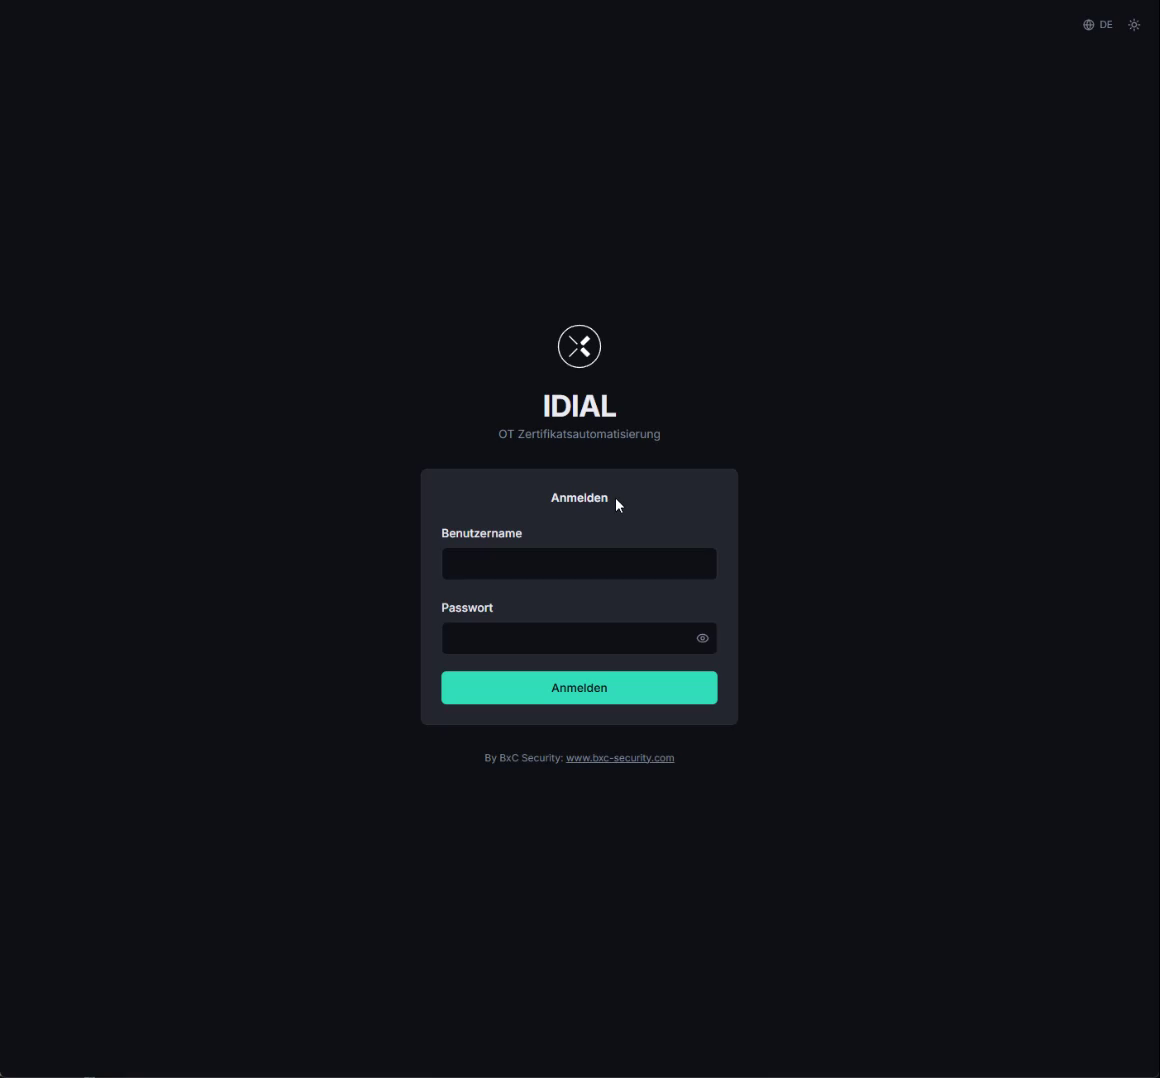
Enter recovery-admin in the Username field and the password you just set in the Password field. Click Sign In.
Step 3 — Upload a License
After the first login, the overview shows the message License Required. Without a valid license, the core features of the application are locked.
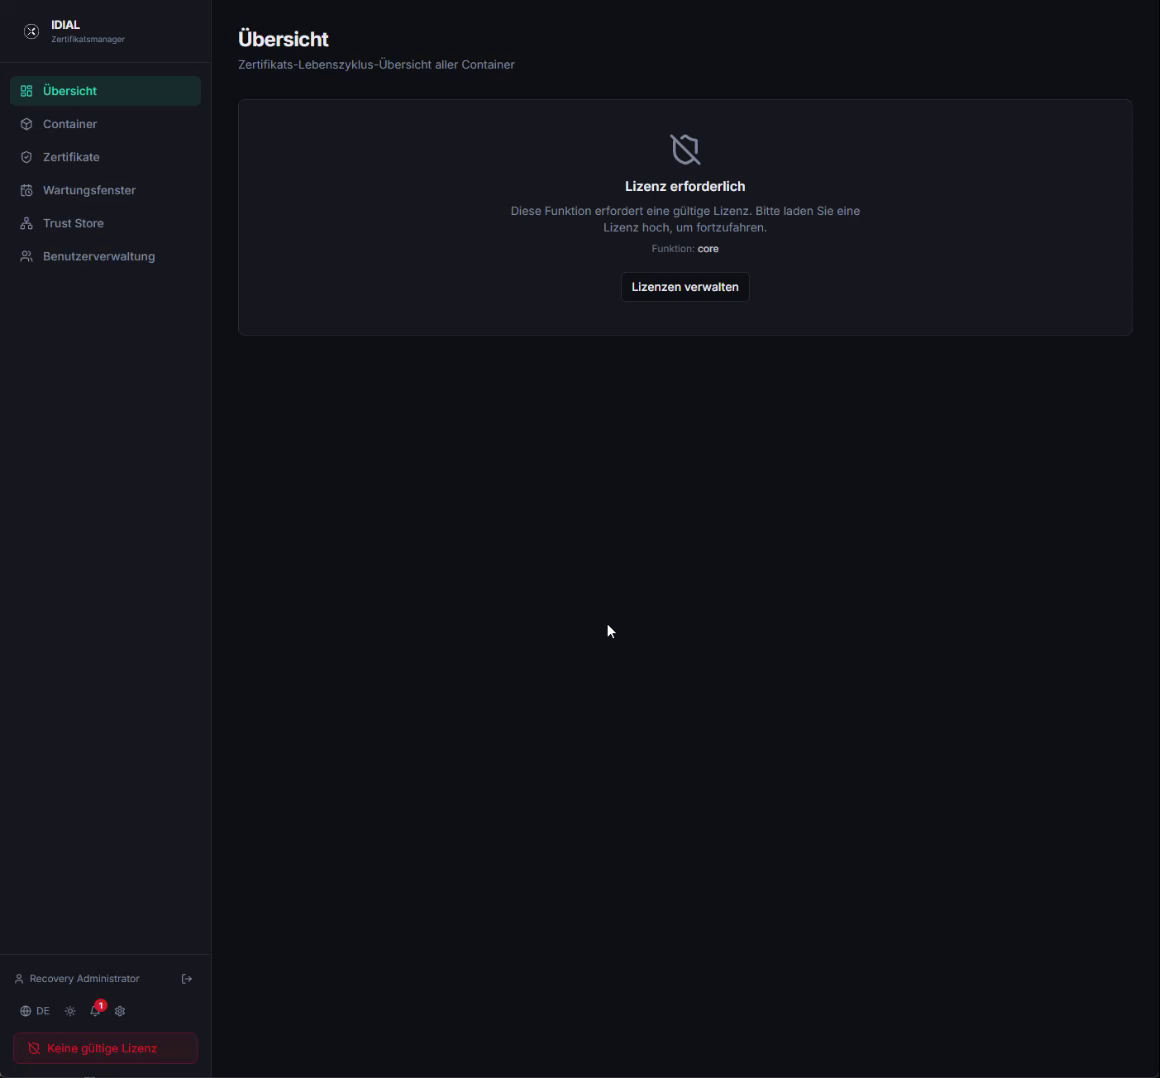
The bottom-left corner of the navigation panel always shows your currently active license status. In this case, no license is present, which is indicated by a red error message.
Click the Manage Licenses button to navigate to the license management section. You can also reach it at any time via the menu item in the left navigation.
Click Upload License in the top-right corner, select the .lic file from your file system, and confirm. The license is automatically validated and activated.
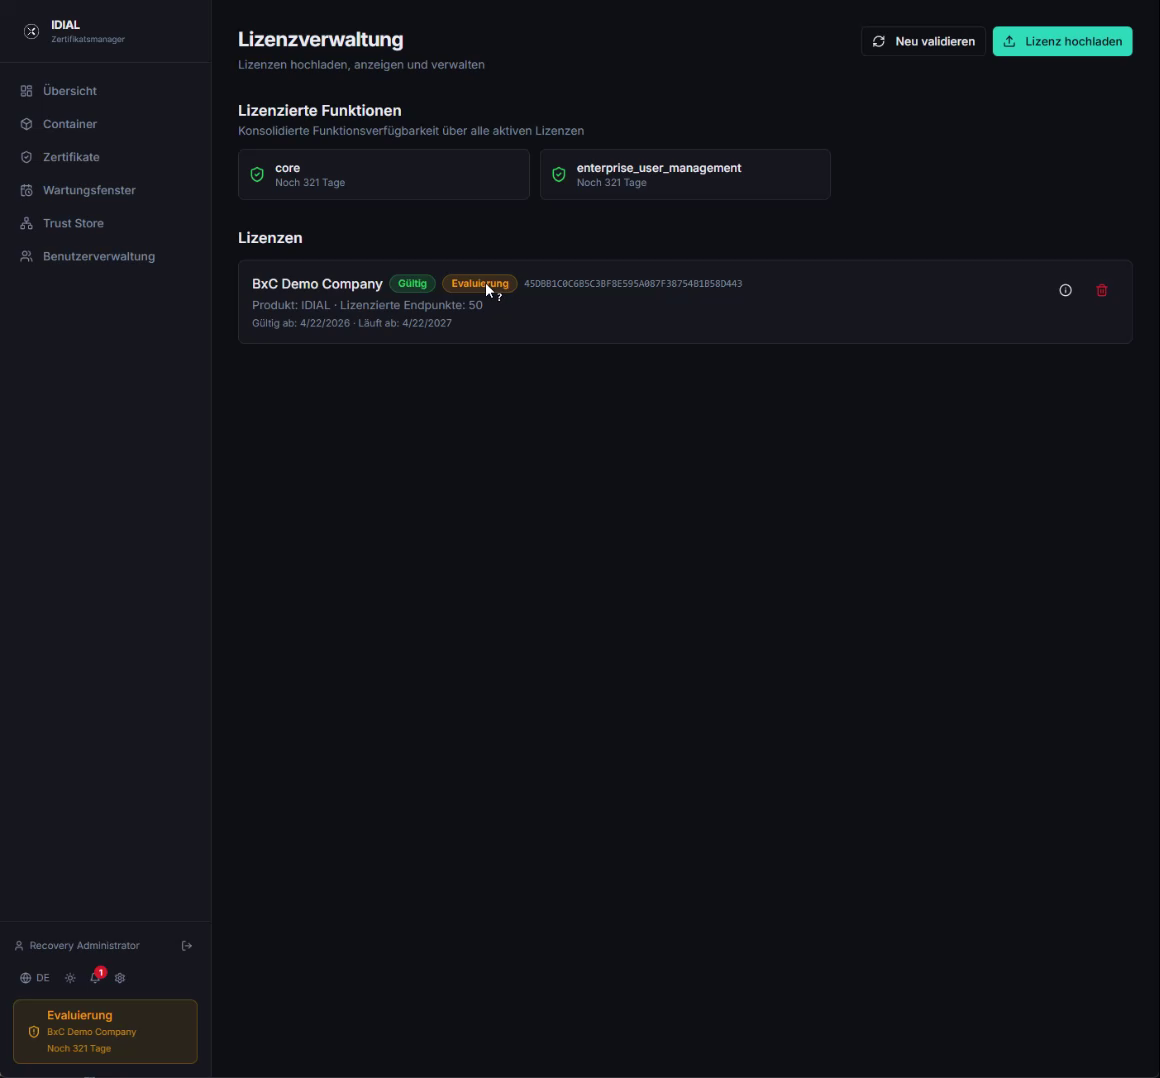
The Licensed Features section shows which features have been activated by the license. The Licenses section lists the uploaded license with its status, type, validity period, and number of licensed endpoints.
If you received an evaluation license (type: Evaluation), it must not be used in a production environment. However, all features are fully available for evaluation purposes.
Step 4 — Create an Administrator User
The Recovery Admin should not be used for day-to-day operations. Create a dedicated administrator user now to manage the application going forward.
Navigate to User Management in the left navigation and click + Create User in the top-right corner.
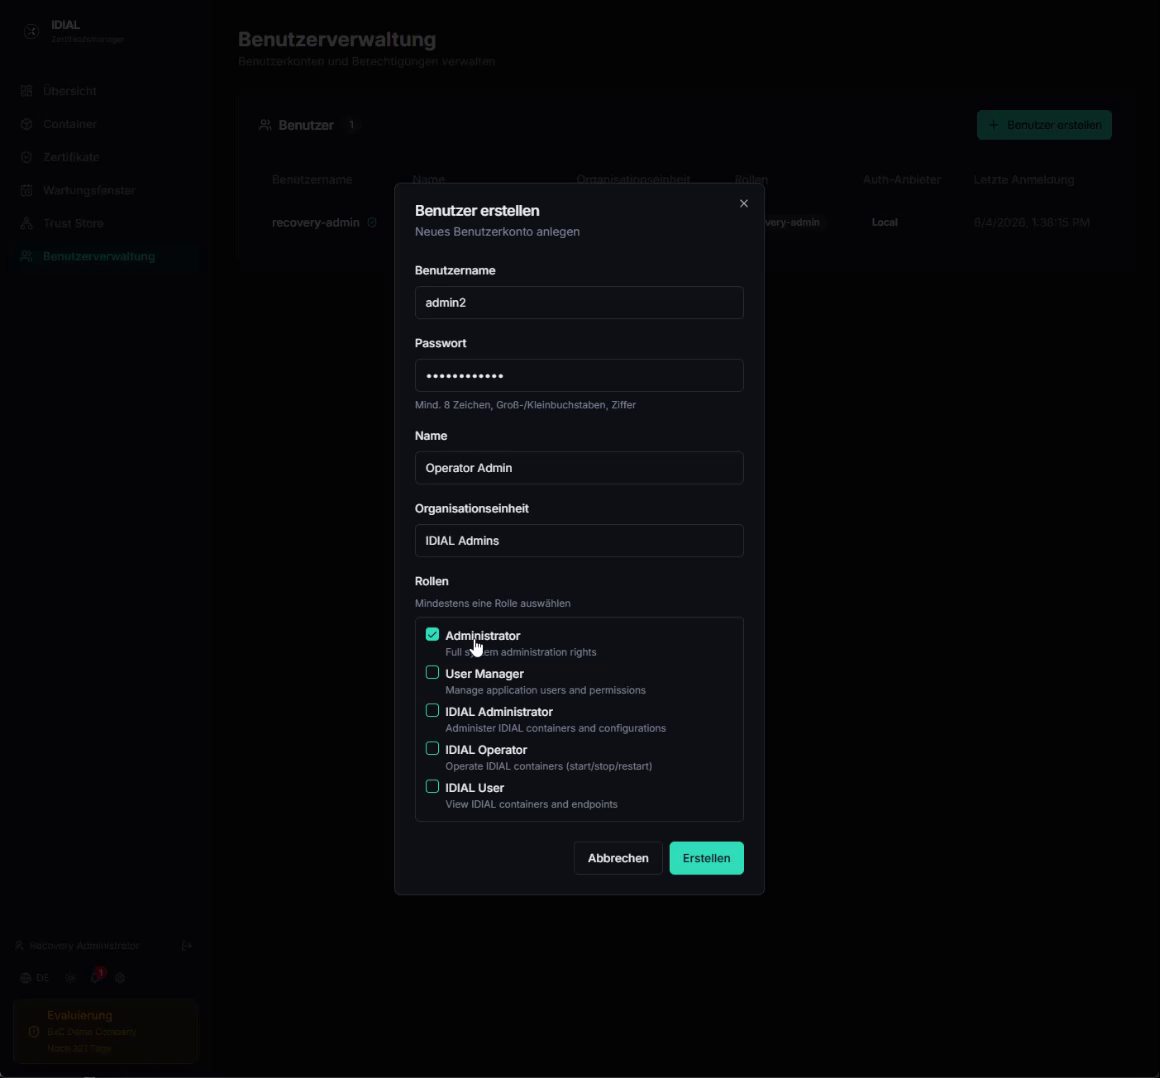
Fill in the fields:
| Field | Recommendation |
|---|---|
| Username | Choose a unique name (e.g. admin) — 3–50 characters, only letters, digits, hyphens, underscores, dots |
| Password | Secure password per policy (8–128 characters, upper/lowercase, digit) |
| Name | Your full name or a label for this account |
| Organizational Unit | Optional — e.g. department or location |
| Roles | Select Administrator from the list |
Click Create. The new user appears in the list.
Log Out and Log In with the New Administrator
Click the Sign Out icon at the bottom of the left navigation panel, next to your username.
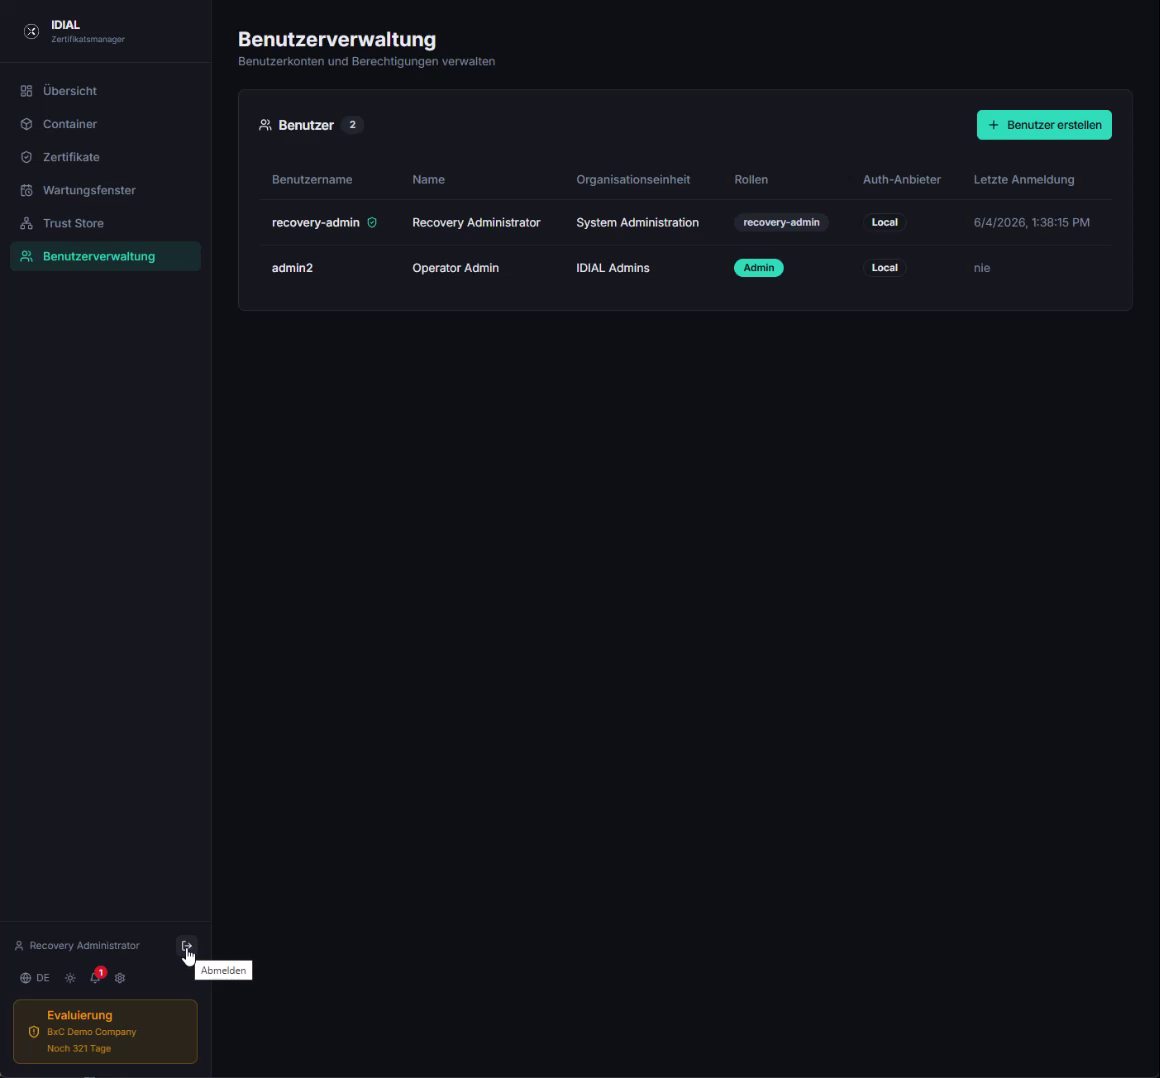
Now log in using the administrator account you just created. From this point on, you no longer need to use the Recovery Admin.
Step 5 — Load CA Certificates into the Trust Store
Before you can upload the TLS server certificate, the issuing CA certificates from your PKI must be stored in the IDIAL-APP Trust Store. The Trust Store allows the application to verify the certificate chain of trust.
Navigate to Trust Store in the left navigation. On a fresh installation, the Trust Store is empty.
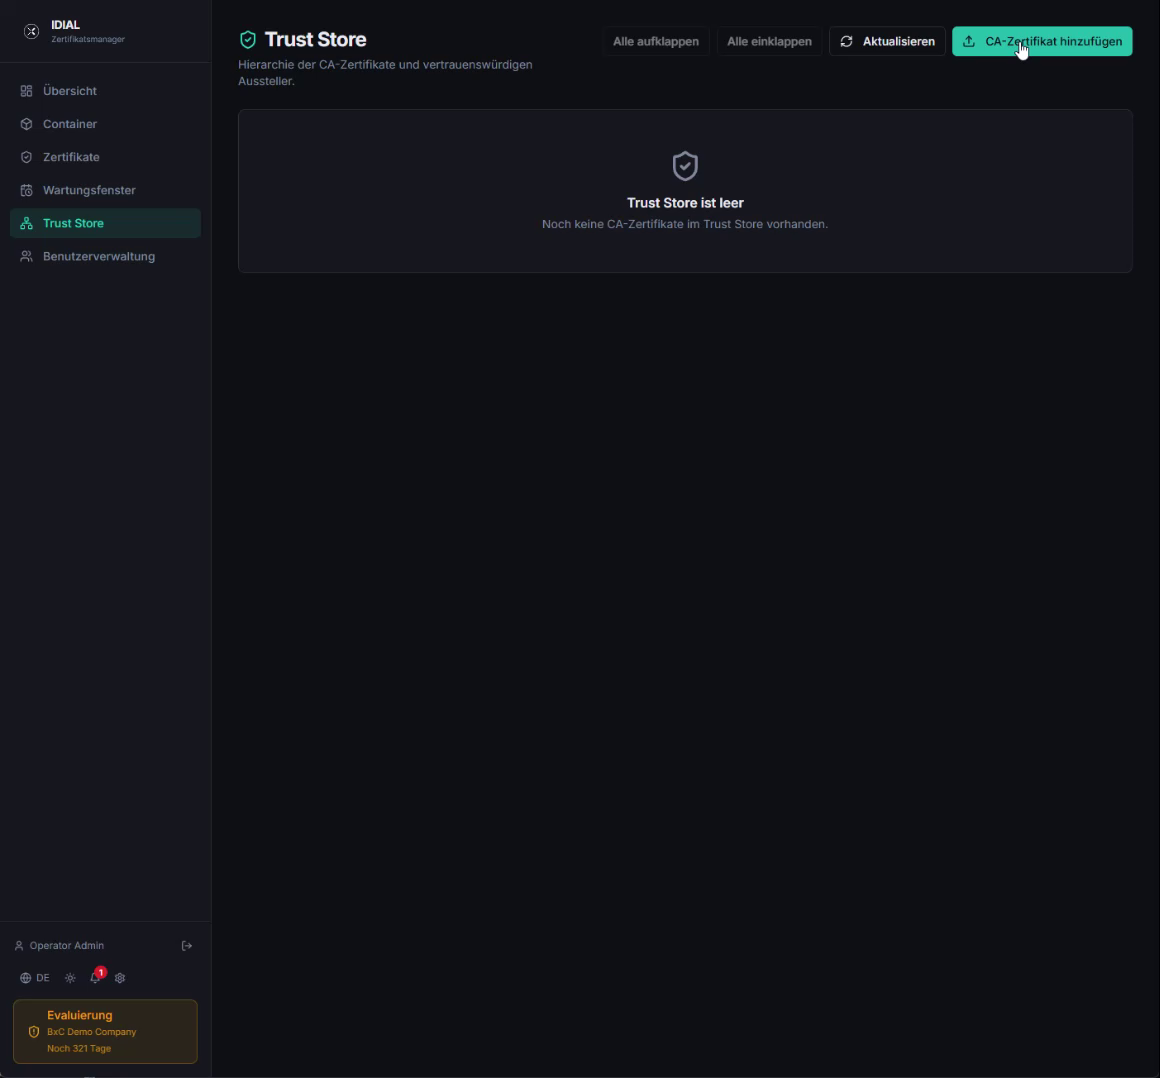
Click Add CA Certificate in the top-right corner.
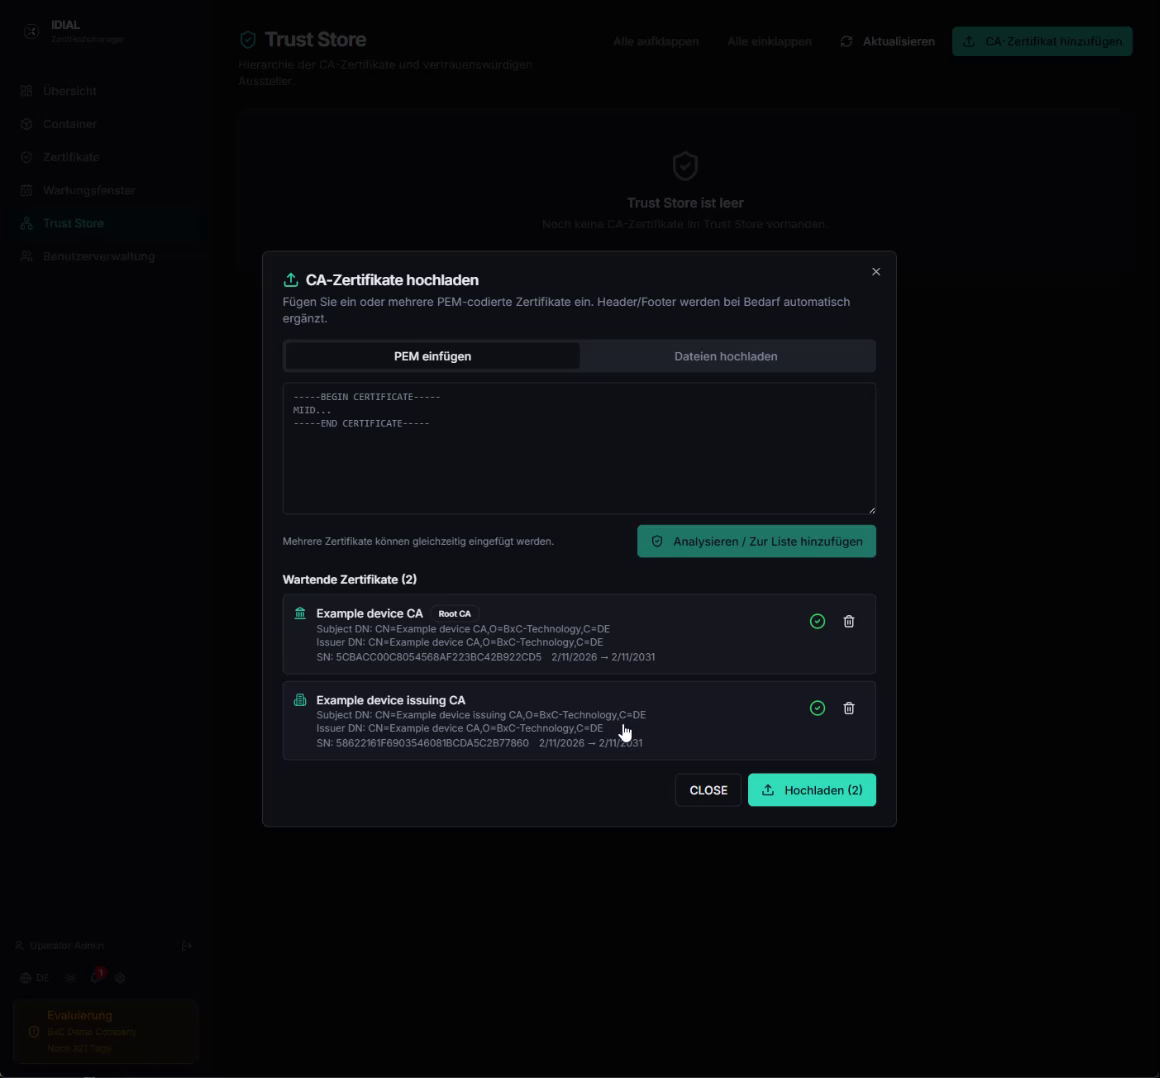
In the dialog, paste the PEM-encoded certificates into the text field — you can paste multiple certificates (Root CA and Intermediate CA) one after the other. Click Analyze / Add to List. The application validates the certificates and displays them as Pending Certificates with name, Subject DN, issuer, and validity period. Certificates with a green checkmark are valid.
The application validates certificates before they can be uploaded to the Trust Store. Invalid or duplicate entries are flagged as errors in the Pending Certificates list and must be removed before the valid certificates can be uploaded. This ensures a consistent Trust Store, which is the foundation for a secure PKI.
Click Upload to add all validated certificates to the Trust Store.
Upload both the Root CA certificate and all Intermediate CA certificates needed to complete the chain up to your TLS server certificate. IDIAL-APP requires the full certificate chain.
The CA certificates stored in the Trust Store are also used to validate certificates deployed to IDIAL containers later. It is worthwhile to load all CA certificates from your PKI here right away.
Step 6 — Configure the TLS Server Certificate
Out of the box, IDIAL-APP uses a self-signed certificate that browsers and REST clients do not trust. Replace it now with a certificate issued by your PKI.
Open Settings via the gear icon in the navigation and click the Server Settings tile.
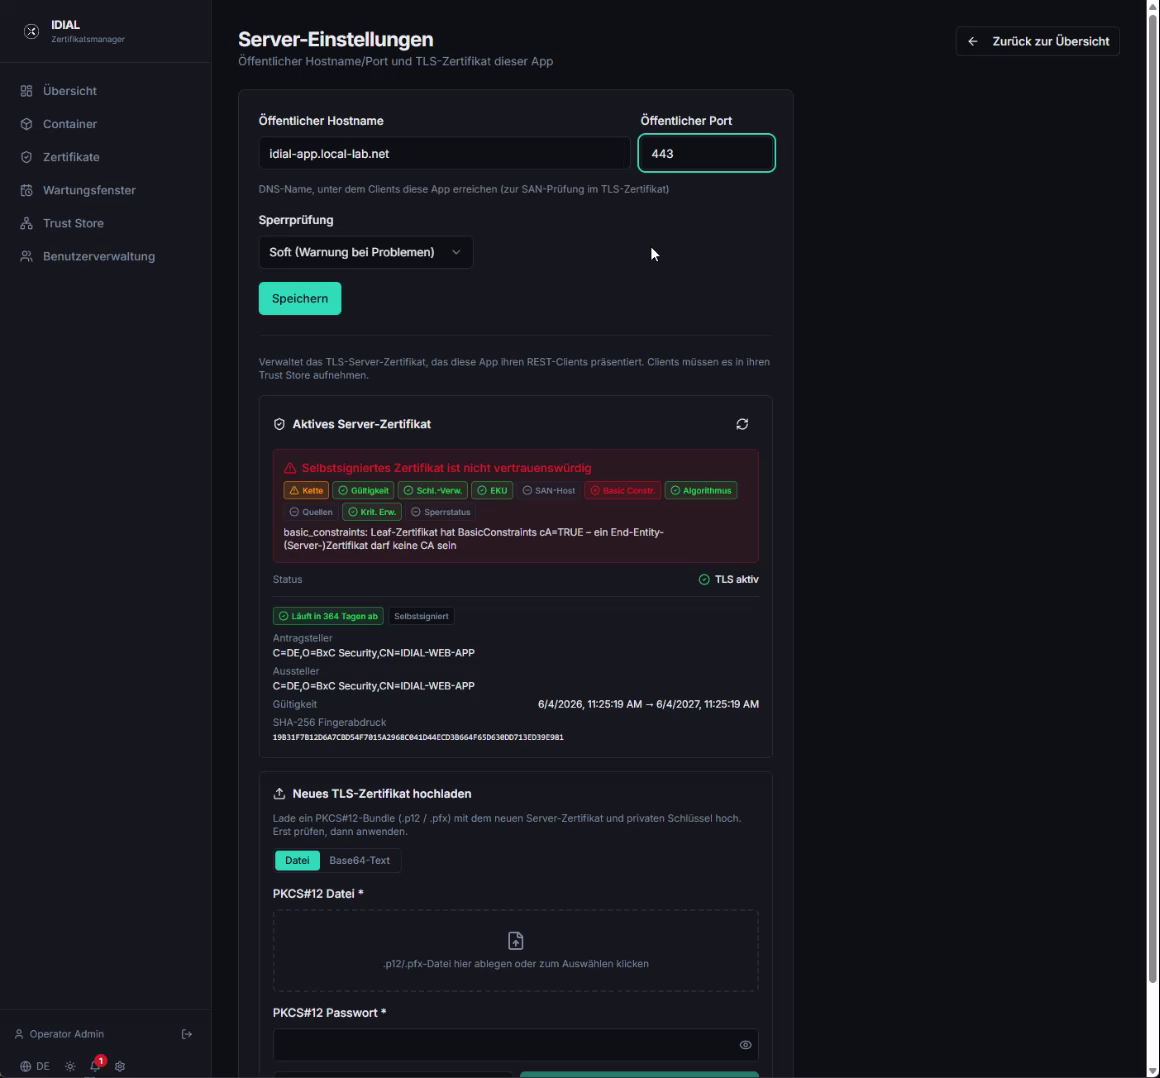
Enter the Public Hostname and Port
Enter the DNS name in the Public Hostname field — this is the name under which IDIAL-APP is reachable by clients. This name must match the Common Name or a Subject Alternative Name (SAN) in the TLS certificate. Enter the HTTPS port in the Public Port field (default: 443).
Click Save before uploading the certificate.
Upload the TLS Certificate
Below the Active Server Certificate section (which currently shows a self-signed certificate with a warning), locate the Upload New TLS Certificate section:
- Click the file field under PKCS12 File and select your
.p12or.pfxfile - Enter the PKCS12 file password in the PKCS12 Password field
- Click Verify — the application analyzes the certificate and shows the validation result
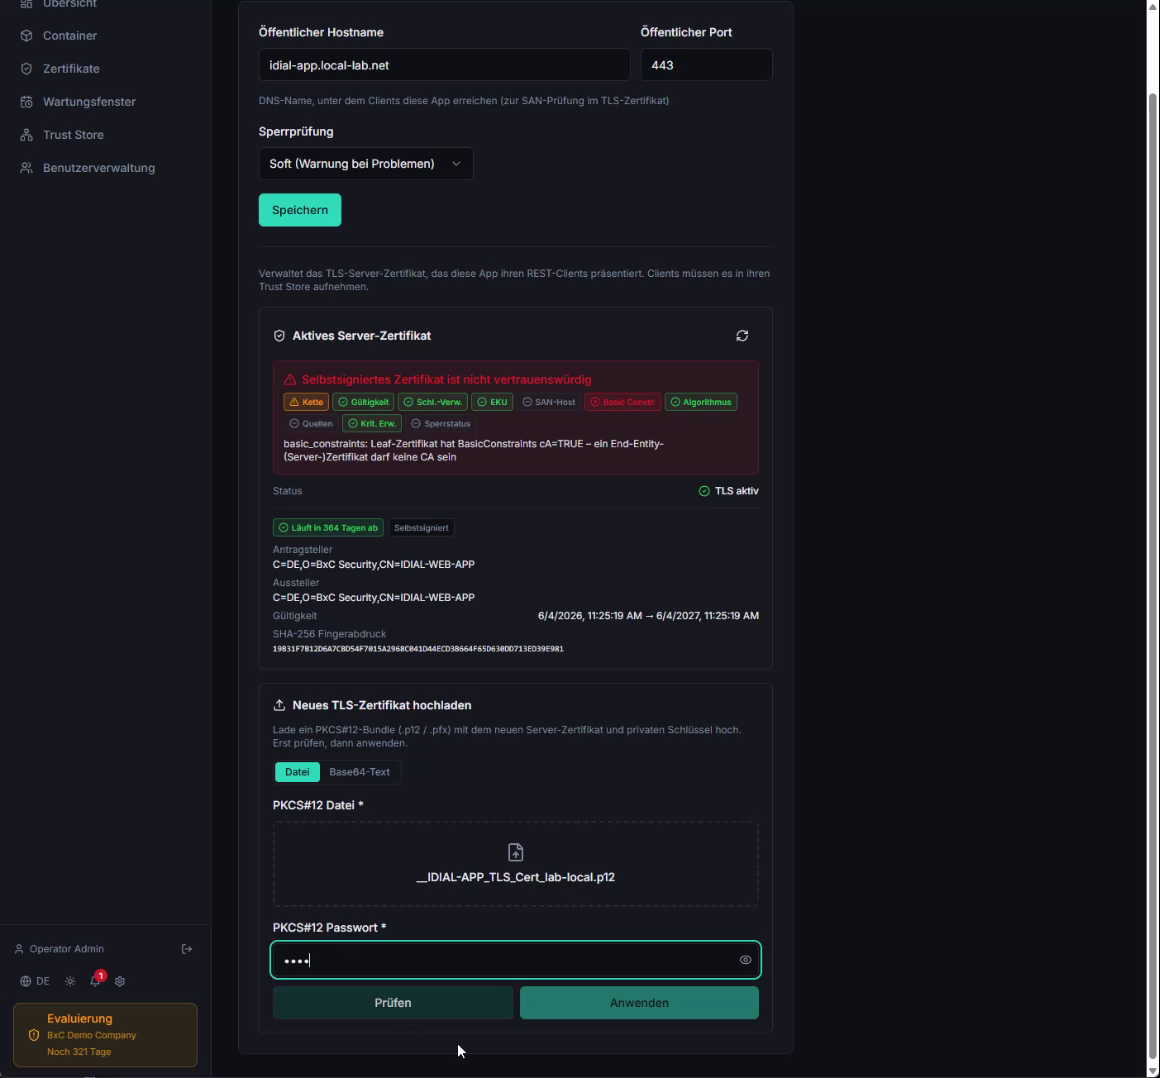
Once all validations pass, click Apply. The server restarts TLS and immediately uses the new certificate.

The Active Server Certificate section now shows App trusts this certificate and all checks are marked green.
After applying the certificate, the application's TLS server restarts (approximately 5 seconds). Make sure you access the page afterwards via the configured DNS name — not via the IP address, as the new certificate will otherwise appear invalid.
The CA certificates from the Trust Store are also required in your users' browsers. Distribute the Root CA certificates within your organization via standard mechanisms (e.g. Group Policy) so that browsers trust IDIAL-APP.
Step 7 — Configure Logging
Open Settings and click the Logging tile.
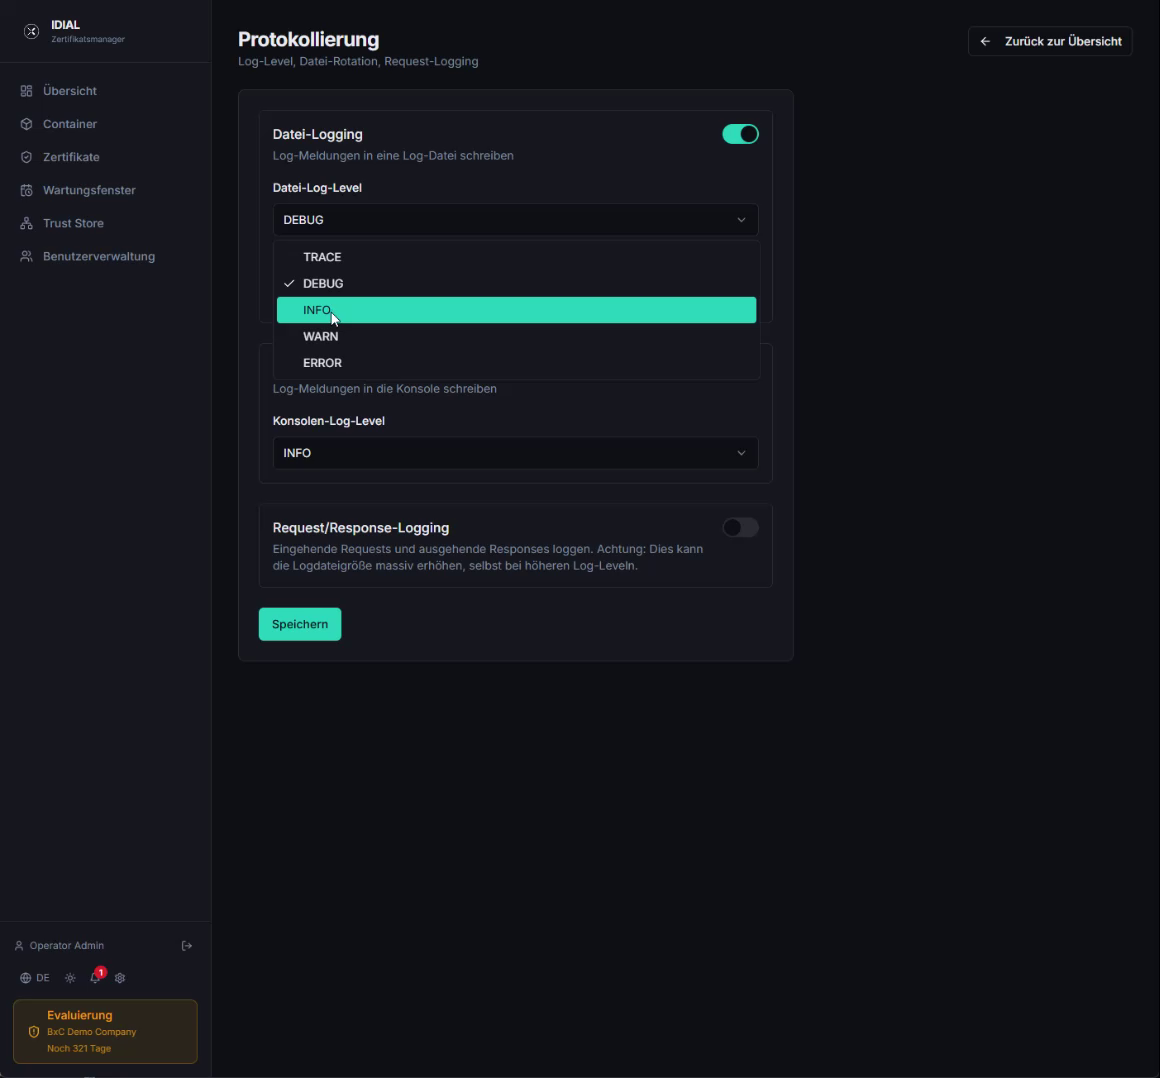
Out of the box, the file log level is set to DEBUG — this generates very detailed and large log files. For production use, change the File Log Level to INFO. Available levels (most to least verbose): TRACE, DEBUG, INFO, WARN, ERROR.
Set the Console Log Level to INFO as well, unless you need debug output on the console.
Request/Response Logging should remain disabled in normal operation — it logs all REST API communication between the frontend and the application and can significantly increase log file size.
Click Save to apply the settings.
The IDIAL Container Communication section in Settings allows you to adjust the timeout values for communication with connected IDIAL containers. The default values are suitable for most environments. Only adjust these if container requests are regularly timing out.
Initial Setup Complete
The basic setup of IDIAL-APP is now complete. The application is ready for operation with:
- A secure Recovery Admin password
- A valid license
- A dedicated administrator user for day-to-day operations
- Your PKI's CA certificates in the Trust Store
- A valid TLS server certificate
- Adjusted logging settings
The next steps are connecting your IDIAL containers to the application and configuring their endpoints and PKI systems. These steps are described in the following guides.